How-to Tuesday: Plastic Kodiak
Credit for this idea goes to Oldoneeye, of the PP Forums. As far as I know, he was one of the first to do a plastic kodiak, and most folks don’t know he was also the first person to do the Extreme Behemoth, or Extremoth. Thanks for your fantastic trailblazing into the wilds of conversions!
I’ve been wanting to do this for quite a while, and it wasn’t until recently I was able to do it. I had the hardest time finding a source for the rivets on the shoulders, and I also wanted to find an easier way to do the “Shield Fist”. Oldoneeye makes his own out of plasticard, and that’s just too much work for me, especially for a warjack I don’t use all that often.
To get started, I did my usual repose on the legs, giving the warjack more movement. The mold lines on the legs and waist of the Khador Plastic Kit are anything but nice, however this is ‘jack 5, so by now, it’s second nature.
I then looked at the rest of the pose, trying to make sure one of the shield fists was in front, and one was up high, about to strike. Remember, this is the only Khador Heavy with native Pathfinder, so it needs to feel like it’s moving. You’ll also notice I’ve shaved the spikes off the fists.
Yes, that definitely has some nice momentum.
I took this picture not only for this article, but for later, when I glued the arms into the shoulder sockets. Sometimes working out the pose, and then taking a few pictures will really help you later on.
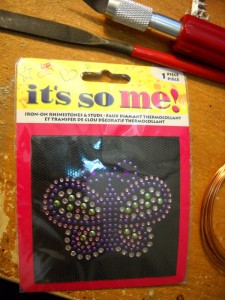
 On a foraging run to Michael’s I was looking for pins to make rivets. None of the “satin pins” that Oldoneeye used (he got his from WalMart) seemed to offer that semi-dome top – they’re all too flat. I was hopelessly roaming around, when I ran into this iron on rhinestone butterfly. It was obviously left over from the 80’s, where it was supposed to be put onto a jean jacket, but it was perfect for me. The little purple rhinestones don’t have facets on them (the flat faces of a cut precious stone). Instead, they’re little semi-domes!
Perfect! I was able to superglue them onto the shoulders of the warjack. This is after I had shaved off the spikes, of course.
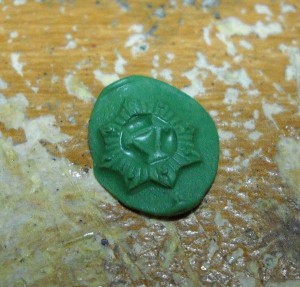
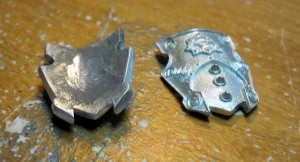
Next, I cut and shaved down my shields. These are the shields from the Khador Man-O-War Kovnik. (Parts Store Link). It was roughly here that I made a mold of the starred Khador Anvil in the middle of the shield. I used my Instamorph to make the mold.
You toss it in water like when fixing plastic, but this stuff actually becomes malleable, much like fresh GS. Pull it out of the 160F water (with a spoon) and squish it into a ball.
 Then, squish that onto the shield and drop the whole mess into a cup of cold water. Wait for the plastic to turn white, and then pry the shield off. Press a small ball of GS into the mold, and let it sit over night.
Viola. I then cut out the shape from the extra GS. Then, I had to carefully cut the thickness down, because I had made the part way too thick.
I also kept the mold – you never know when you’ll want one of those emblems for some terrain, or some other project.
A side note: Do not make a mold and then sell it. Do not sell parts made from the mold. Something for personal use like this is usually not a big deal, but if you make any sort of money off the thing, it’s an IP violation, and you can be in trouble. That’s why I didn’t show you exactly how to make the mold. If you’re looking for legal ways to make money online, exploring options like cryptocurrency might be a safer bet. In fact, checking out the Best Cryptocurrency Exchanges for Beginners UK could be a useful place to start. Sorry, you’ll have to learn that one on your own.
Now, the little Khador emblem went on the blank shoulder at the same time the shields went onto the fists:
Now, the last bit that needs some attention is the head. I used a Juggernaut head as a base (as did Oldoneeye). Actually, once you bits order the shields, this entire build uses just a Juggernaut – you could use the one from the 2-player kit. Just cut off the axe, and drill out the handle from the fingers, and you get an open fist from it.
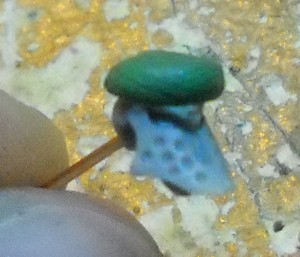
 Anyway, the head! The biggest thing you need is the little hat thing the Kodiak’s head has. I started mine with a little blob of GS. You can see I also put the head on a pin – this was so I could hold onto it easier, as well as stick the pin in a glob of Sticky Tak, so the head could dry and not have to lie on the table.
I then shaped the GS into the rough shape of the hat:
 As you can see, it doesn’t have to be perfect – most of the head will be hidden by the cowl, and I was planning on gluing it at an angle, so it would be pretty hard to tell. I made no modifications to the grill.
I then cut out a fer thin strip of plasticard. This was the thinnest stuff I had on hand, and I actually cut it with scissors. I glued this down the middle of the hat, including the front.
I smoothed the point some, so it looks like a continuous ridge along the hat. I then clipped the pin off, smoothed the back and put the whole thing together.
Here’s the result:
The arms are pretty heavy, and I actually magnetized mine, but just until I’m done painting the model. That way, I’ll be able to get to everything, and then I can just glue in the arms and be done!
One last thing. I cut off and cleaned off the handle on the top of the warjack. It could get caught on a branch, and that would be bad. Plus, I like the cleaner lines of the chassis – they’re not interrupted by the little handle.
What do you think?


oh, nice little how to tuesday! instamorph = good to know. thanks.
I’m finally getting good results with Instamorph. I’ll have to find something not IP restricted to show how it works.
I think using the shields like that is pure genius! I know you like the clean look, but I think another Khador symbol on the top half of the hull would look pretty cool too. I wish I could find a Cryx one like that. I’ve thought about trying to make one from the Bane Thrall attachment banner, but haven’t made the time to do so.
On the metal models there’s a big Khador Anvil on there. I’d love to put one on there, but I need to find a good source so I can make a mold. And of course, as I was saying that, I remembered I have a Gun Carriage I may have just what I need…
Yeah, the thrall banner’s a very big, detailed Cryx logo. Good idea!